Tuesday, March 4, 2014

Pressure box seal

On to the pressure box seal…

I wanted to try a leather seal for the pressure box, so I gathered my scissors, contact cement and a strip of split leather.


Busker organ pressure box seal

First I laid the leather strip over the rim of the pressure box and cut it to approximate length, leaving a little extra for final trimming.
I found that the scissors didn't work nearly as well as a new razor blade. The razor blade was easy to push down and make a straight clean slice. I cut all the corners at 45s.

Busker organ pressure box seal


I then applied contact cement to the rim and the cut strips of leather, waited about 10 minutes then pressed the strips into place.


Busker organ pressure box seal


For the rim of the lid, I chose to go with chamois, but since I didn't have it in a nicely cut strip like the leather, I had to first make my own strips. I have a rotary paper cutting board, and I found that it did an excellent job of making straight cuts through the chamois.

Cutting leather with a rotary paper cutter

I repeated the length cutting and cement process and here's how it looks:

Busker organ pressure box leather seal


Busker organ pressure box leather seal

Overall, it seems to only add about an 1/8" (at most) to the height when the lid is in place:


Busker organ pressure box leather seal


If it proves to be an adequate seal, I'll probably stain the ouside edges to match the exterior a little more closely. If it doesn't work well, I guess I can razor-blade it off and try a more synthetic alternative.


Monday, March 3, 2014

Mounting the tracker bar and fitting the tubes

Now that I've got the pressure box window installed, I'm eager to see whether the pressure box will indeed hold any pressure.

Since I've got no holes in the back or side panels, the only places where air can leak are: around the take-up spool shaft, the tracker bar base, the lid seal, and the lid window seal. Of course there could be leaks around any of the panel joints as well.

Since I've put an oil/air seal around the take-up spool shaft, that should be OK, and I'm fairly confident in the 4+ coats of shellac on all of the wood panels and joints. So, I decided that the next step was to get the tracker bar mounted.

I drilled the tracker bar base ends and used it to mark corresponding holes in the tracker bar platform, then I fitted the bottom of the tracker bar with some strips of foam weatherstripping (coloring the grey foam black around the edges with a sharpie).

I attached it with some brass machine screws and nuts:


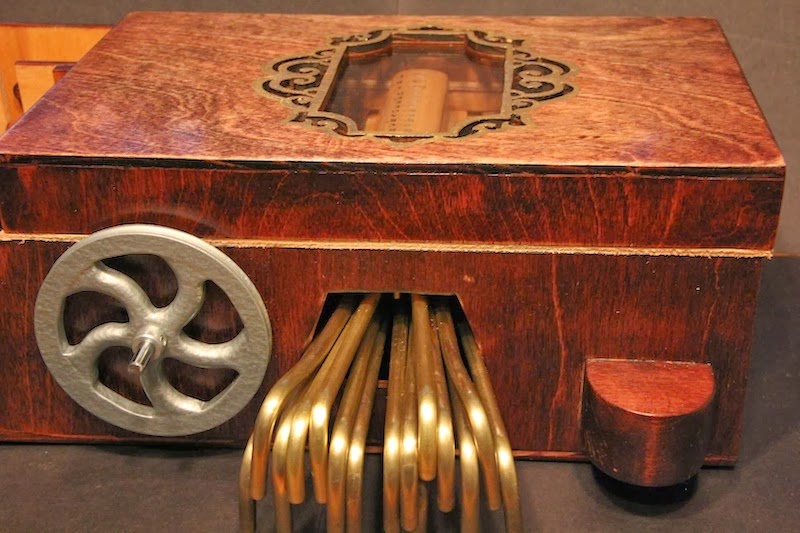
Then I fit my crazy brass tubing to the bottom side of the tracker bar:


Saturday, March 1, 2014

Attaching the spool drive wheel

So with it raining cats and dogs only 2 days after my wife moved all the table saws out to a new shed she built, I've been puttering around looking for some other things to do inside the house.

I polished up and shellacked my brass tracker bar tubing, and while waiting for that to cure I thought I'd get the spool shaft drive wheel fixed into place.

After thinking of various possibilities and looking around at what I had on hand, I decided to attach a black oxide shaft collar to my wooden spool drive wheel. I have a bunch of small roll/spring pins and I figured that I could drill holes partway into the shaft collar sides so that the pins would sit halfway in. The protruding parts of the pins could then be secured into the wooden wheel:


Driling was a little tricky but using some vise-grips to hold the collar under the drill press made it a little easier.

I then slid the spool drive wheel and the shaft collar onto the shaft to align them and then pressed the shaft collar's pins into the wooden wheel to mark a couple of drilling points.

I then drilled into the wood, pressed the collar into place, and gave the collar a coat of silver paint.


I put a nylon bushing on the shaft and then slid the collar/drive wheel unit onto the shaft.


I'll cut the shaft a little more closely when I get all the mechanical stuff finalized.


Sunday, February 23, 2014

Pressure box window

Continuing work on the pressure box, I wanted to attach the lexan window in place, but realized there were several things I had to do first.

First off, my 7" diameter lexan circle was just a little too large to fit in place between the strengthening strips on the underside of the pressure box lid. Armed with my 100 grit sanding block, I filed down a couple of edges so I could fit it in. Then, using a printout from the original scrollwork pattern, I marked some drilling marks for the pilot holes for the mounting screws. I drilled holes through the lexan then, holding a tiny drill bit between my thumb and forefinger, I "hand drilled"into the underside of the pressure box lid using the piece of lexan as a guide.

John Smith Busker Pressure Box Window


Using a variation of an idea suggested by Steve Toyne on the forum, I next cut out a ring of chamois to act as a gasket between the lid and the lexan. At this point I had to put the window on hold as I realized that I needed to complete the exterior finishing of the lid before affixing the window, as it wouldn't do to have stain, sanding dust, shellac, etc. falling down onto the window. Even though the window would be screwed in place rather than glued, I didn't want to wear out the holes by working the screws repeatedly (the panel plywood is only about 3/16" thick).

I'd been planning on doing some ornamentation of the window scrollwork, and I thought about doing some gilding around the edges. I've never done any gilding before, but I thought I'd give it a try.

I first used a Krylon "leafing pen", but it really just looked like gold paint. I figured it would make a good base to the metal leaf in case I had some spots where the leafing didn't stick.


John Smith Busker Pressure Box Window

It took me a couple of attempts to get the hang of the metal leafing, and it left a lot to be desired upon close inspection, but the difference in reflectance from the gold pen was pretty dramatic when angled around under lights.

Gold Leafing John Smith Busker Pressure Box Window


Gold Leafing John Smith Busker Pressure Box Window


Next, I shellacked the top with 3 coats and baked it for an hour in the oven at about 175ºF in order to even out the brush marks a little. Once it was dry and cooled down, I set to work attaching the lexan window.


John Smith Busker Pressure Box Window


Since the chamois gasket/seal passes under the mounting holes, I used a push-pin to punch through the chamois and mark the holes.

John Smith Busker Pressure Box Window


Here's what it looks like with everything in place on the underside:

John Smith Busker Pressure Box Window

John Smith Busker Pressure Box Window

And here are a couple of views of the top side:

John Smith Busker Pressure Box Window

John Smith Busker Pressure Box Window