Saturday, December 29, 2012

Groovy Wheels

The wooden wheels I cut out are used for driving the take-up spool. The larger of the wheels is on the same axle as the take-up spool and it is driven by the rotating action of the crankshaft which is translated through a spring tensioned axle that holds the idler wheel. The idler wheel is fitted with a rubber ring and it uses the rubber friction and the spring tension to keep it in contact with the spool wheel. All of this is eventually hidden in the casing of the organ, and the only way to see it would be to install hinged panels on the case (which I'll likely do) or make the thing out of plexiglass (yuck).

To put the requisite grooves in the edges of the spool and idler wheels (to accommodate the Hoover vacuum cleaner belt/ "tire"), I first put a short machine screw through the small hole I had drilled in the center of each wheel and secured it in place with a nut. The screw needed to be a tight fit, so I kept poking around in my junk cans until I found a couple that were tight enough that they needed to be put through the wheel with a screwdriver.


I then attached the wheel to my drill press using the machine screw as a shank, then - after making sure of the rotation direction - I tried various odds and ends to cut out the groove. I tried a drill bit, a needle file, sandpaper wrapped around a rod, and even a piece of 1/4" threaded rod. The drill bit was too jumpy, the needle file and sandpaper got varnished quickly and didn't remove material fast enough, but the threaded rod worked fairly well. I held the rod parallel to the the wheel and used the threads to cut into the material. My wife brought me a bullet shaped grinding stone from the dremel tool case, and I soon found that this was the best solution, as it allowed for fast material removal and a great degree of control over the shaping of the groove.


A groove fit for a genuine Hoover tire. Too bad they don't come in a whitewall model.


If you really have too much time on your hands you can watch the unedited director's cut of this fascinating process here:

Friday, December 28, 2012

The Pressure Box Window

Here's something that's hopefully a little more interesting than posts about cutting circles and rectangles...

While looking around ebay for the remainder of my busker needs, I found someone selling plexiglass/lexan in small sheet and circles. Since I'm not that great at cutting lexan, the idea of using a 7" circle interested me and started me thinking of options for the pressure box window where you can look down and see the punched music roll passing by. Using the rounded rectangle window as laid out in the plans would have meant that a lot of the lexan would be "wasted" inside, unless I resorted to cutting it.

Since I'm hoping to give a vintage look to my busker, I thought it might be nice to have a more ornate type of window, so I started looking around google images pages for something that looked right.

After about 2 hours of searching using various keywords, I came across an image I really liked:


I took this into Photoshop and stretched it a little, resized it, made it symmetrical, and turned it into a stencil with horizontal and vertical centerlines for alignment:


I printed out a couple of copies and experimented with a piece of scrap wood to see if the pattern was something I could handle on the scroll saw. After encouraging results, I assembled my supplies - Ruler, square, pencil, stencil pattern, spray adhesive, pressure box lid piece, "FrogTape" (painter's tape), scissors, needle files and sandpaper:


Then I covered the top of the pressure box lid piece with FrogTape, trimmed the stencil pattern and took it outside to apply spray adhesive to the back of it, then stuck it in place on top of the tape covered lid piece.


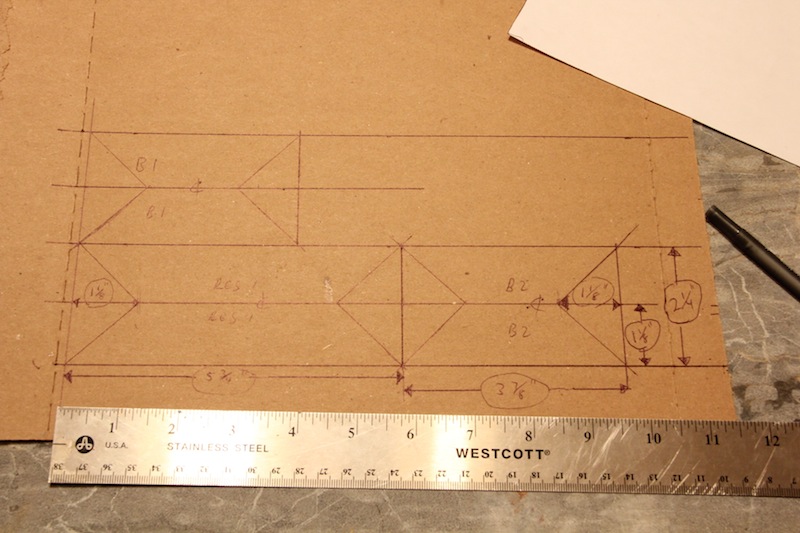
I had drawn alignment lines in pencil on top of the FrogTape to match up with the corresponding alignment marks on the stencil pattern.


I also covered the back of the board with some tape to prevent excessive splintering of wood (or so I hoped) from the action of the scroll saw on the plywood veneer edge. (In hindsight, I should have covered the entire back surface with tape, since the uncovered areas got fairly dirty with all of the scroll saw handling and rubbing.)


I then had to drill holes in each of the stencil cutout areas so I could feed the scroll saw blade up through the material before clamping the blade for cutting. 22 holes altogether.


Then I set to work carefully cutting out each part of the stencil.


It soon became apparent that my scrollsaw was on its last legs, so I set out to Sears to buy a new one. I had some less-than-perfect Christmas gifts to return at Sears, so with my store credit for the returns, the new saw only set me back about $60. (I don't really consider this an "organ expense" since tools are more like an investment - with this in mind, I should probably revise my first post about supplies and expenses.)

Here's some cutting with my new cheapie Craftsman scrollsaw:


It took anywhere from 5 to 30 minutes to cut out each section...


After a break for some leftover Christmas turkey, mashed potatoes, stuffing and gravy, I'm back at it into the night, aided by my trusty SnakeLight.


After the cutting is complete, here's what the front looked like:


And the back (with its grimy smudges):


Now ready for cleaning with the needle files and sandpaper:


This ought to look nice with a music roll running below it.


Time to move on to something else now...

Thursday, December 27, 2012

Circle Cutting


I was going to do some more interesting cutting, but my scroll saw is on it's last leg, so I'm off this afternoon to buy a new one.

In the meantime, I thought I'd set up a jig for cutting the idler and spool wheels with a bandsaw.

First, I took a piece of scrap plywood big enough to span the distance from the bandsaw blade to the parallel groove in the table, then I attached a thin strip of scrap wood to the bottom of the plywood along with another scrap to act as a stop and slid it into the sawblade to make a reference cut.


I then took a square and marked a line even with the leading edge of the blade. I marked this off with the idler wheel diameter measurement (2 1/2"), and the spool wheel measurement (3 3/4"), and then drilled a small hole at the centerpoint of each diameter (1 1/4", and 1 7/8" respectively). 


From the bottom of the jig, I inserted a nail to act as a pin or axle for the 1/4" hardwood stock I was going to cut. I realized I had to also drill out enough room on the bottom of the jig to make sure the nailhead was recessed.


I then drilled a small hole in the stock to fit it on top of the nail "axle", then started the saw, slid the jig up to its stop and turned the stock into the blade to make the wheel.


I opted to go for hardwood, as I have a huge pile of dense dry hardwood, and I didn't like the idea of using plywood for the wheels - I'm not particularly fond of plywood in general, although I realize it's necessary at times.


Here's a short video of the cutting in action:


I promise I'll have a more interesting post tomorrow!

Tuesday, December 25, 2012

Cutting 1/4" Plywood Sheet


Before I lose the kitchen table to Christmas festivities, I thought I'd squeeze in some more cutting. I took my 2' X 4' piece of quarter inch plywood and marked it off like so:


Then I took it out to the saw and wound up with this:


That takes care of most of the skeleton of the organ, and I think I can use pieces from my scrap wood pile to fill in the rest.

I made the sides about an inch bigger all around since I had enough wood, figuring I may need the internal space, or if not, I could trim them down later.

Hope everyone has a Merry Christmas!

Monday, December 24, 2012

Cutting the Basswood Pipes


I've started on the pipe wood cutting. Melvyn Wright's book "Getting Started on the John Smith Busker Organ" is essential for this!


I used 4 sheets of 1/8" x 4" x 36" basswood for the first 17 pipes, and 3 sheets of 3/16" x 4" x 36" for the 3 largest pipes. I tried to find the most economical layout for the initial crosscuts, but I think I would have been better off purchasing one additional sheet for the larger pipes. A caveat: While Melvyn's book mentions that you can get by with 3 of the thicker 4" x 36" (or 100mm x 915mm) sheets for the bass pipes, the measurements specified make it impossible to use the offcuts from the largest pipe (535mm) for use for the smallest of the 3 bass pipes (385mm). I had to come up with a creative layout in order to get all the pieces out of the wood I had.


I didn't do a crosscut for pipe #1 (the smallest pipe) since I figured I'd have enough scrap left over for this pipe, and I didn't want to cut into an additional piece of stock. Some of the markings such as "16 + pt. 17" indicate that I was planning to use some of the crosscut for pieces of pipes 16 and 17. These would be crosscut to the length of the longer pipe of course, then trimmed to length after the final cutting when necessary.

In hindsight, I would have arranged the individual crosscuts a little differently so that I could fit them into my 9" bandsaw a little more easily.

After crosscutting the stock, I set to work marking the languid lines per Melvyn's Book instructions. (While I was doing this I was thinking that I should have made a marking guide as he suggested, rather than measuring and squaring each of them one by one. I also thought that I should probably stop and get my bifocals out of the bedroom. By the time these thoughts had run their course, I was finished anyway.)


Here they are, cut and marked and ready for ripping. Also in the picture are my measuring tools and a newly made sanding block with 100 grit on one side and 220 on the other:


Then let all the pieces soak in a gallon of chocolate syrup.


(Actually, just a container for keeping all the pieces together as they go from the saw table to the kitchen table.)


Then they're laid out to make sure nothing is missing, and get ready for a date with the sanding block.

(From bare wood to this stage took me about 3 hours - working time + thinking time.)


If this guy howls when I play the harmonica, just wait......


I hope basswood is OK for the languids... Everything specifies "hardwood" and technically, basswood is a hardwood. Then again, so is balsa wood, "technically".

Sunday, December 23, 2012

The Cutting Begins


Just for a little background info for those who are not familiar with the John Smith Busker Organ, here's how it works, in a nutshell:

A crank handle is turned which operates a crankshaft that moves the paper music roll from one spool to another and operates two bellows which pressurize an air reservoir. The air moves from this reservoir up into the airtight chamber which contains the paper music roll. This "pressure box" is fitted with a "tracker bar" which is a wooden block with a row of precisely spaced and sized holes in it. The only way the pressurized air can escape this pressure box is through the holes in the tracker bar. As the punched holes in the music roll move across the tracker bar, the air escapes through the corresponding tracker bar holes. These tracker bar holes are each connected via rubber tubing to the individual wooden pipes to produce the musical notes.


Even though I'm still missing a few odds and ends, I've gotten impatient and have begun some cutting:

Here are a few photos of my marking and cutting out of the bellows and reservoir stiffeners. 
--I used thick, stiff cardboard I found on the inner lining portion of a box of Gain laundry detergent. I'm a little unsure if the soap residue will have any detrimental effect on the glue adhesion, but it doesn't seem like the soap has penetrated the cardboard to any great degree. I just hope that once the bellows are pumping it won't smell like a laundromat --


My main mistake with this was cutting double the amount of reservoir side stiffeners. I started with the reservoir sides thinking I was doing the bellows sides, but I soon discovered the measuring error.

I found that an inverted marble tabletop made a nice cutting surface.